TensorRT's 200% Speed Boost with a Catch: Accelerating Neural Networks using NVIDIA Technology

Can you really generate image twice as fast? Is it even possible to boost the performance to such a scale without upgrading your GPU hardware?
This article will highlight the potential benefits and potential trade-offs in utilizing TensorRT for image generation in Stable Diffusion context. I will use A1111 as an graphic user interface for SD.
- Update: NVIDIA TensorRT Extension
- The Need for Speed in Image Generation
- Installation of TensorRT in A1111
- TensorRT in A1111: A Case Study
- Using PhotomatixRT Experimental Model
- The Catch: Balancing Speed and Quality
- Future Directions and Conclusion
- When RT Model is Not Working: Issues and Solutions
- References
Update: NVIDIA TensorRT Extension
NVIDIA published a new extension with different functionality and setup, read the article here. It supports SDXL models and higher resolutions, but lacks some features (like LoRA baking).
The Need for Speed in Image Generation
First things first: Utilizing a custom TensorRT SD U-net truly halves the generating time (the results may vary for the specific application, the inference speedup should be theoretically more than 30x). It does not work with SDXL (yet), possibly due to novel conditioning schemes of XL models or memory constraints. Also, the building process is GPU specific, so the TensorRT can be limited on the GPU model architecture it was built on.
Due to the resolution of outputs generated by a TensorRT model, LoRA and token count limitations, the usual workflows cannot be fully employed. Despite this limitation, it is still possible to create a very detailed image (as seen in the galleries).
The limits at the moment can be a decisive factor for a lot of users. Also it is an experiment for daring and rather advanced users (at the present). However, integrating TensorRT into the pipeline is possible even now — for specific uses. Lets take a look at the examples and a brief tutorial.
Installation of TensorRT in A1111
I suppose you have NVIDIA RTX card (which takes an advantage of the TensorRT technology) in this article. How to start with TensorRT models in A1111 in three easy steps:
Step 1: Install A1111
Create a new installation of A1111 in SDRT folder (optional but really recommended). You may read full article on A1111 SD installation here or follow the basic steps (if you have all prerequisities already installed):
- Create folder SDRT (name it as you wish), and run
cmdterminal within it - Enter
git clone https://github.com/AUTOMATIC1111/stable-diffusion-webui.git - Run A1111 once to finish installation (takes much longer, it is downloading a lot of files)
- Get your SD models (the one you will be experiment with is enough) into stable-diffusion-webui/models/Stable-diffusion, embedings into stable-diffusion-webui/embedings/, LoRAs into stable-diffusion-webui/models/Lora, VAE and upscalers into their proper folders and so on.
Step 2: Install TensorRT Extension
You can find the extension in Extensions/Available/Load from, search for TensorRT. Aternatively, the github page is https://github.com/AUTOMATIC1111/stable-diffusion-webui-tensorrt. Install and restart A1111.
Step 3: Download NVIDIA TensorRT
Download it from NVIDIA https://developer.nvidia.com/nvidia-tensorrt-8x-download (you will need developer program account for this, but I suppose you already have it). GA means General Availability Release. Click I Agree To the Terms of the NVIDIA TensorRT License Agreement and choose the proper CUDA version (I suppose in most cases it will be the one marked with the arrow):
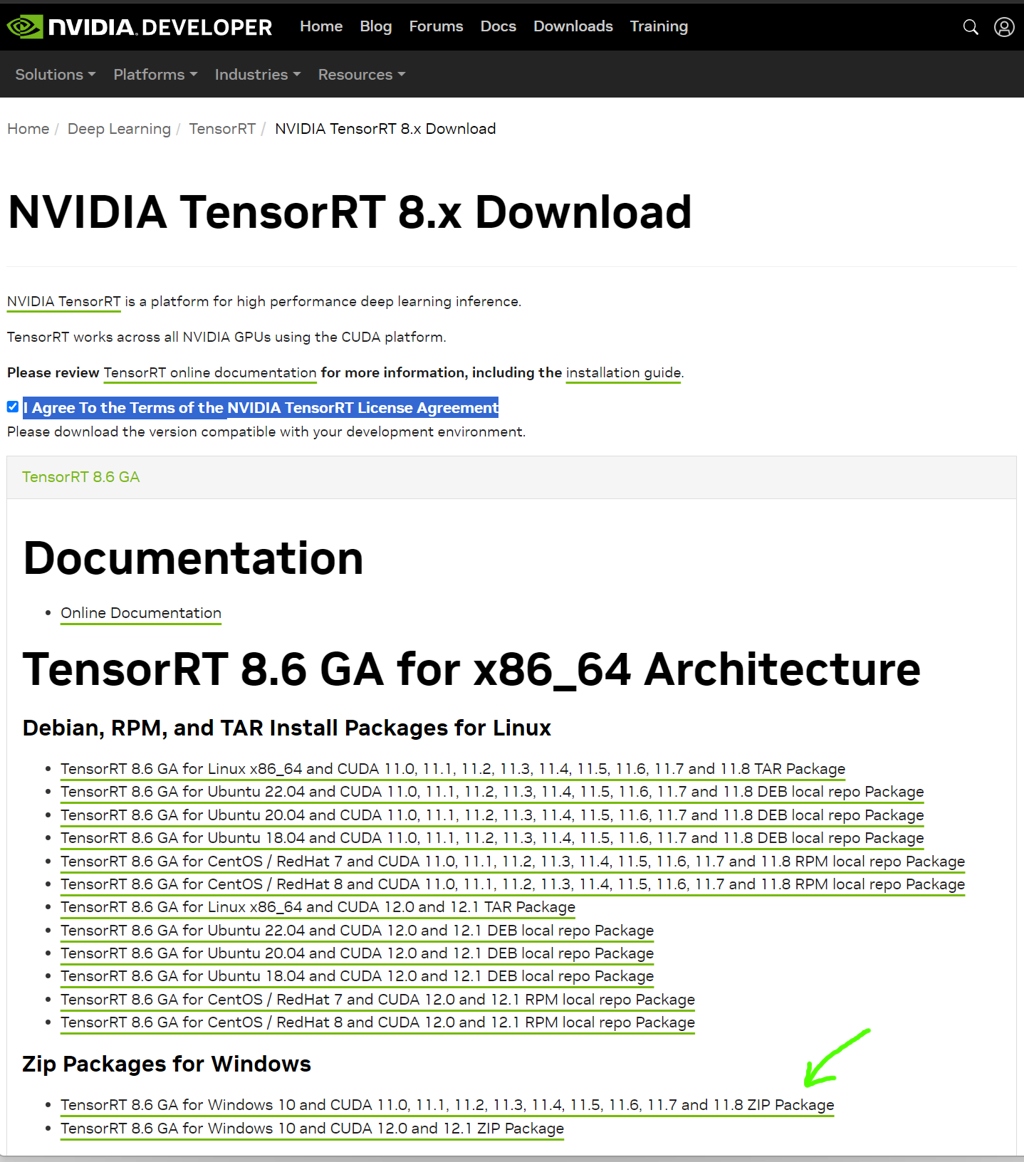
Unzip the downloaded folder into stable-diffusion-webui\extensions\stable-diffusion-webui-tensorrt (created within the extension installation in previous step):
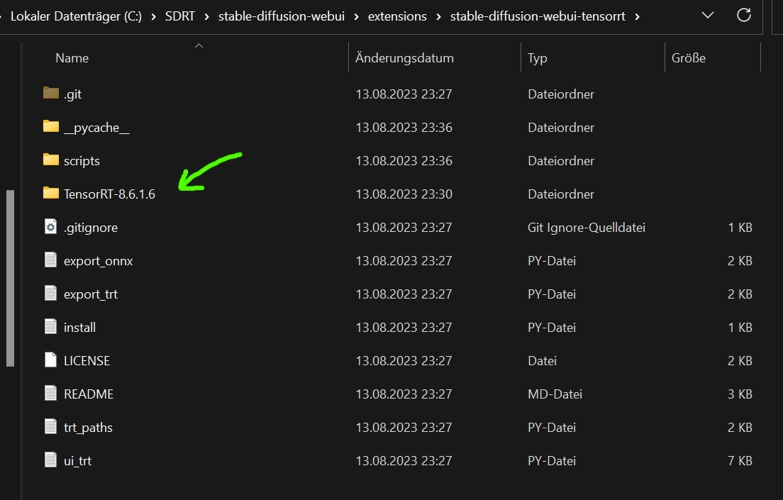
Restart A1111 afresh!
TensorRT in A1111: A Case Study
Now, the extension looks like on the image below. The control is simple. Convert to ONNX will convert your model into .onnx (which will go to \stable-diffusion-webui\models\Unet-onnx) and Convert ONNX to TensorRT will takes the previously created .onnx and "convert" it to .trt file in \stable-diffusion-webui\models\Unet-trt.
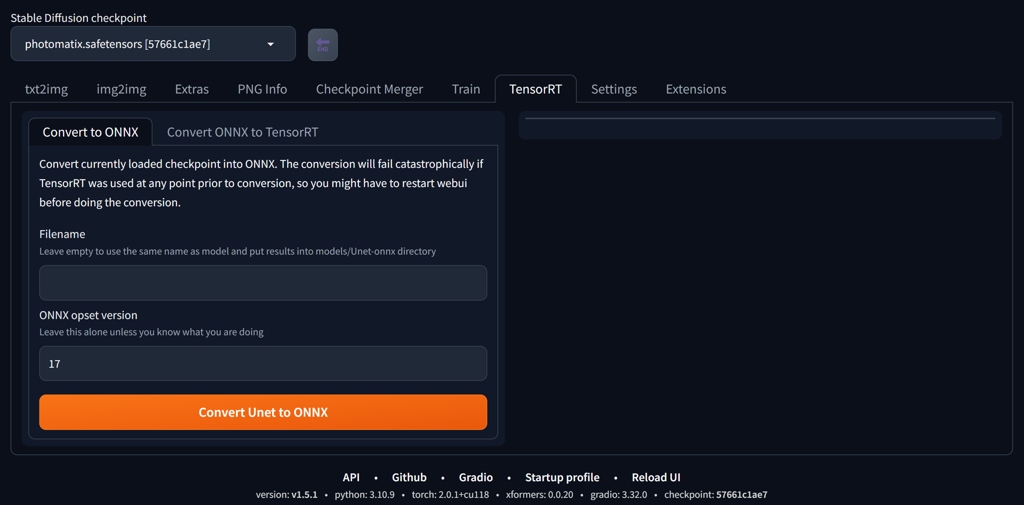
Setup of A1111
We will adjust the settings for use with TensorRT U-net. We later want to be able to choose comfortably between U-nets from the interface. Go to Settings/User Interface/Quicksetting list and add sd_unet there. You can also add sd_vae and CLIP_stop_at_last_layers when you are at it. Apply and Restart.
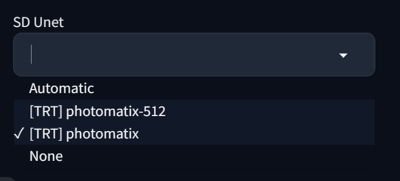
You may also add Lazy load parameter (NVIDIA Lazy module loading) to your batch file (xformers and api arguments are optional):
@echo off

set PYTHON=
set GIT=
set VENV_DIR=
set CUDA_MODULE_LOADING=LAZY
set COMMANDLINE_ARGS=--xformers --api

call webui.bat
TensorRT Model: What it Does?
It "freezes" or "bakes" the current loaded model, including LoRAs. The "conversion" will take couple of minutes (ONNX) plus 30m-1h (TensorRT .trt part) for a standard SD15 model (times relative to A4000 performance).
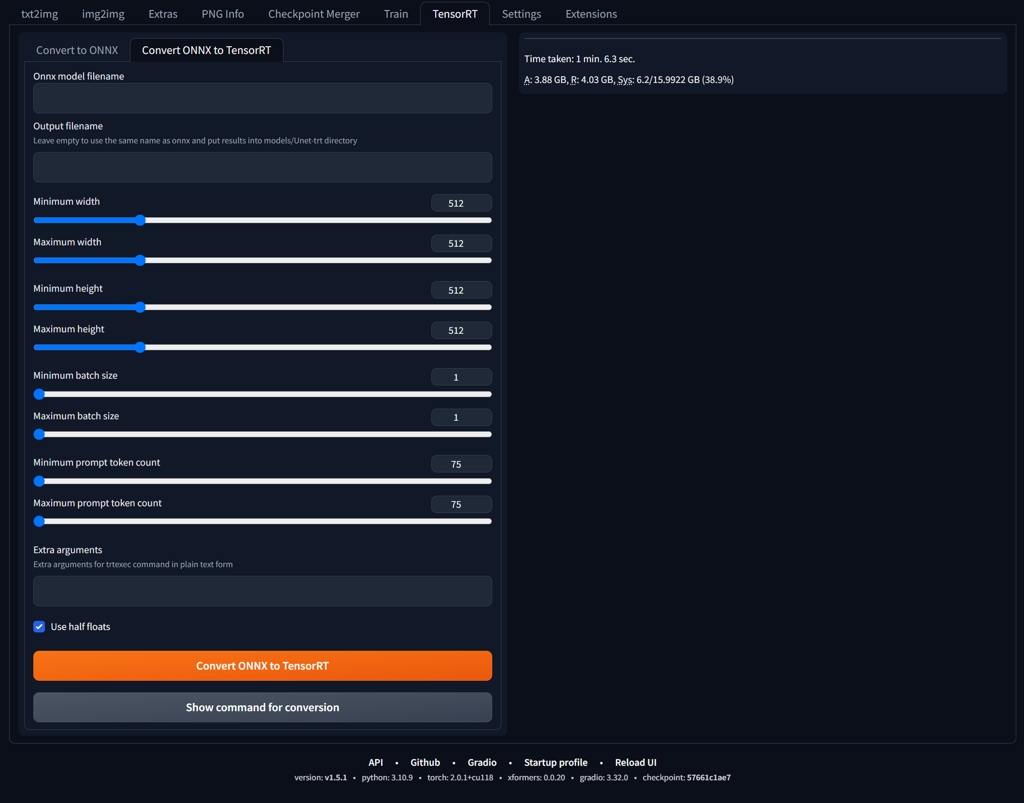
Creating TensorRT Model
- Start A1111 afresh.
- Generate one image using the model you want to convert, using LoRAs you want to bake in.
- Switch to TensorRT tab. Creating .onnx is self explanatory just push the orange button. Takes couple of minutes.
- Experiment with .onnx to .trt conversion setup. If you will not get any fatal errors, the process should begin and take around 30mins-1h.

Test Model and Its Limits
TensorRT supports only certain shapes (image ratios). At the moment it does not work with more than 75 tokens in positive prompt and 75 tokens in the negative (it is probably a bug). Also batch size is very limited (may be specific for a graphic card). Basically, you can create standard 512x512 sizes in batch of 4, or one batch of higher resoutions. I was able to create a model with a maximum of 832x832.
- ADetailer works only at limited number of shapes and ratios
- Hires fix works only at limited number of shapes and ratios, up to the maximum size of TensorRT model
- Token limit allows only a selection of styles and embeddings
- Regional prompter does not work, perhaps because of token limit
- ControlNet not yet functional
- Additional LoRAs does seem to work only partially
| 768x768 | AD | 512x768 | AD | 832x832 | AD | 512x512 | AD | |
|---|---|---|---|---|---|---|---|---|
| Euler a | 10 | 21 | 5 | 11 | 14 | 29 | 3 | 9 |
| Euler a RT | 3 | 8 | 2 | 5 | 4 | 9 | 1 | 3 |
| DPM++SDE | 20 | 42 | 11 | 22 | 28 | 57 | 7 | 15 |
| DPM++SDE RT | 7 | 15 | 4 | 10 | 9 | 18 | 3 | 6 |
Photomatix vs PhotomatixRT (portrait, 1 batch, AD=ADetailer), 20 steps, A1111 with --opt-sub-quad-attention, no xformers. Units seconds, A4000. In some cases the speed gain was almost 300%.
Using --xformers lowers the advantage, TensorRT is offering a considerable speed boost only in 512x512 resolutions:
| 768x768 +AD | 512x768 +AD | 832x832 +AD | 512x512 +AD | |
|---|---|---|---|---|
| Euler a | 9 | 6 | 11 | 5 |
| Euler a RT | 8 | 5 | 9 | 3 |
| DPM++SDE | 17 | 12 | 21 | 12 |
| DPM++SDE RT | 13 | 9 | 18 | 7 |
Xformers will change determinate results, but if you are using the module (and many people do), at the moment, the benefits of the TensorRT model are mainly in terms of style (although some speed gain still exists).
Using PhotomatixRT Experimental Model
Install TensorRT and set A1111 as described above. Download the model into \stable-diffusion-webui\models\Unet-trt. Refresh SD Unet model list in GUI and choose the [TRT] photomatix with Photomatix as the base model.
Workflows to Test
There may be different options for different cards. I was able to create a TensorRT model on A4000 with 1 batch size and maximum of 832x832 size to allow some space for Hires fix. I was using my usual crash test dummy model Photomatix (SD15) to create PhotomatixRT (Experimental TensorRT). My workflows for the best outputs:
- Generate standard SD15 resolutions (512x512, 512x768, 768x768) with or without ADetailer.
- Generate 512x512 image with Hires fix 1.634 and ADetailer.
- Generate image up to 832x832 and upscale later (ADetailer works only on some sizes)
- The images in the galleries were created during single txt2img run
Using Several U-nets
You can create several "freezed" variants of TensorRT models and quickly switch between them.
The Catch: Balancing Speed and Quality
With the issues stated above, the usability of the models is limited. However, considering the ongoing developments, the outlook is indeed promising. While the technology may not currently be very flexible, envision a scenario where rendering times are halved for SDXL types of models...
TensorRT models are efficient for testing overtraining of LoRA models.
Future Directions and Conclusion
There are real-world scenarios where the compromise between speed and quality might be acceptable.
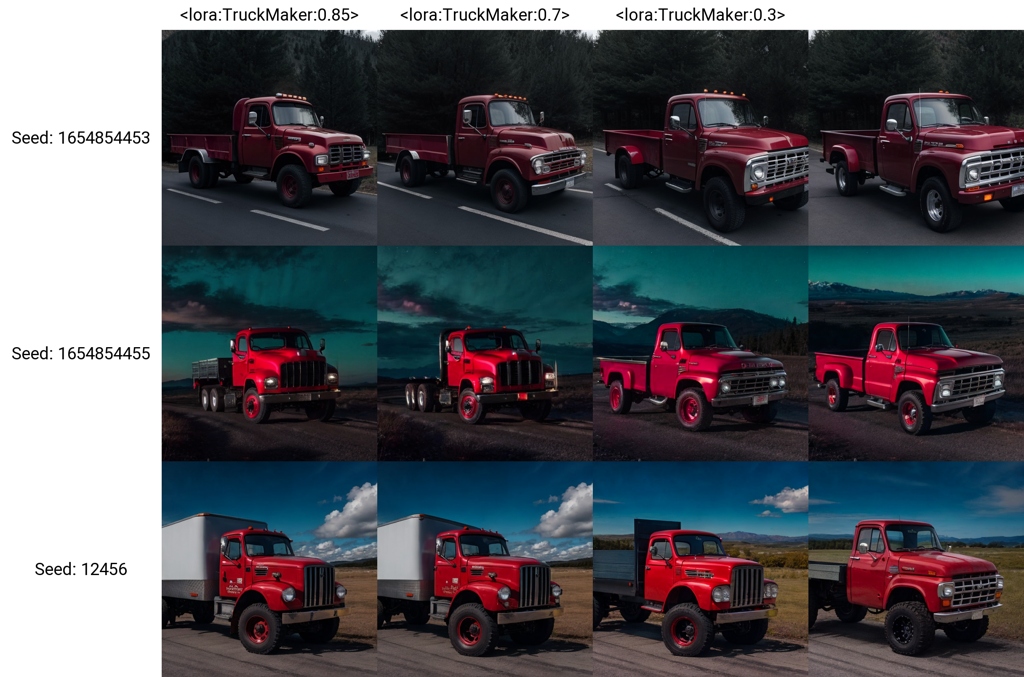
Another option is to use SD unets for various tasks, where a high resolution is not really needed, or to create a starting point for further processing. Over all, with all its glitches and limitations for this application, I was pleasantly surprised with the results.
When RT Model is Not Working: Issues and Solutions
Higher resolutions RT models (512+) do not work when when Negative Guidance minimum sigma is active (Settings/Optimisations), gives Exception: bad shape for TensorRT input x: (1, 4, 64, 64) Set it to 0.
ControlNet is not yet working with RT.
References
- PhotomatixRT on Huggingface (experimental TensorRT version with "chiaroscuro" outputs)
- NVIDIA: https://github.com/NVIDIA/TensorRT
- NVIDIA TensorRT Articles: https://developer.nvidia.com/tensorrt
- A1111 Extension: https://github.com/AUTOMATIC1111/stable-diffusion-webui-tensorrt
Test outputs with PhotomatixRT


