AI for Designers: Training Custom LoRA Models
LoRA (or Lora) is a small trained model for Stable Diffusion. LoRA (Low-Rank Adaptation) allows users to easily fine-tune a model for a specific purpose—to generate a style, character, object, or feature. The use is simple, you download the Lora file (.safetensors) and put it into the /models/Lora folder. You will activate the Lora by putting its name in the prompt, sometimes using a specific token (prompt word). In AUTOMATIC1111, you may select Loras from the list via the Show/hide extra networks button under the Generate button.
You can obtain a lot of Lora models, and you can also train a custom one yourself. By combining Loras you can achieve high level of control on the specific features of the final output. In this example, we will train a simple Lora for texture generation and style.
Contents
- What You Need to Start
- Important: When You See Errors After Upgrading Kohya to a New Version
- Installation of Kohya Training Tool and UI
- Folder Structure for image and caption pairs
- TIP: SDXL Redux Workflow
- Preparing Image Datasets (Image and Caption Pairs)
- Image Annotation Utilities (Tagging)
- Annotation (Captioning) Strategies
- Training without an Annotation
- Quick Kohya Setup for LoRA Training
- Training for 3D Texturing
- Object and Concept Loras
- Underfitting and Overfitting
- Testing the Results with X/Y/Z Plot Script
- Merging and Fine-Tuning
- How to Continue Training
- Tips for SDXL Training
- Conclusion

What You Need to Start
You need NVIDIA GPU with enough VRAM. I suggest a minimum of 10 GB for SD and 16GB for SDXL LoRAs.
- Python 3.10.9 (correctly installed with system paths), PyTorch and Git
- AUTOMATIC1111 Installation with a standard or custom model checkpoints
- You can learn on how to install A1111 and all prerequisities for the Stable Diffusion use in this article tutorial
Important: When You See Errors After Upgrading Kohya to a New Version

When you encounter some issues after upgrading, run setup again and go through options 1,2,3—then you should be able to run the GUI with option 4. The manual configuration of acceleration (3) is the same as in following article. In case of PyTorch issues with CUDA versions, delete VENV folder and reinstall PyTorch by using option 1 in setup (takes some time).

You should see no errors on gui startup.
Installation of Kohya Training Tool and UI
- Kohya Trainer install: https://github.com/bmaltais/kohya_ss
- go to the target folder you want to have the training tool and in the terminal console enter
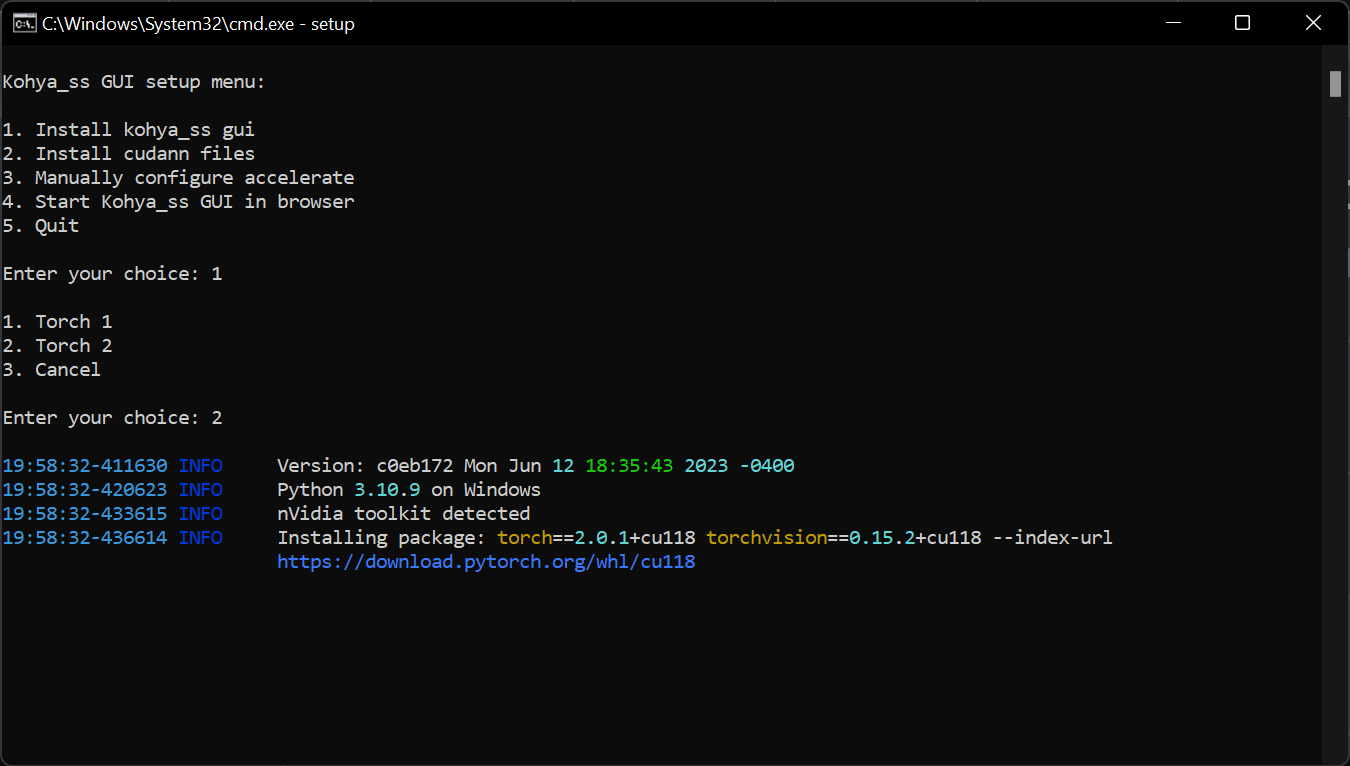
git clone https://github.com/bmaltais/kohya_ss.git - run setup.bat (type setup in the folder),
after accelerate config line press enter - select the options:
- This machine / No distributed training / run training on CPU: no / Torch dynamo: no / Deepspeed: no / What GPU: all / fp16 or bf16: fp16
CUDA NN and NVIDIA Toolkit
Optional (but not really): If you have NVIDIA card, follow the instructions for cuDNN installation (optional but recommended). This will require another download and moving proper files into C:\kohya_ss\cudnn_windows (use the recommended files from the creator of the toolkit for the older versions of CUDA). After the copying, run the activate script in terminal:
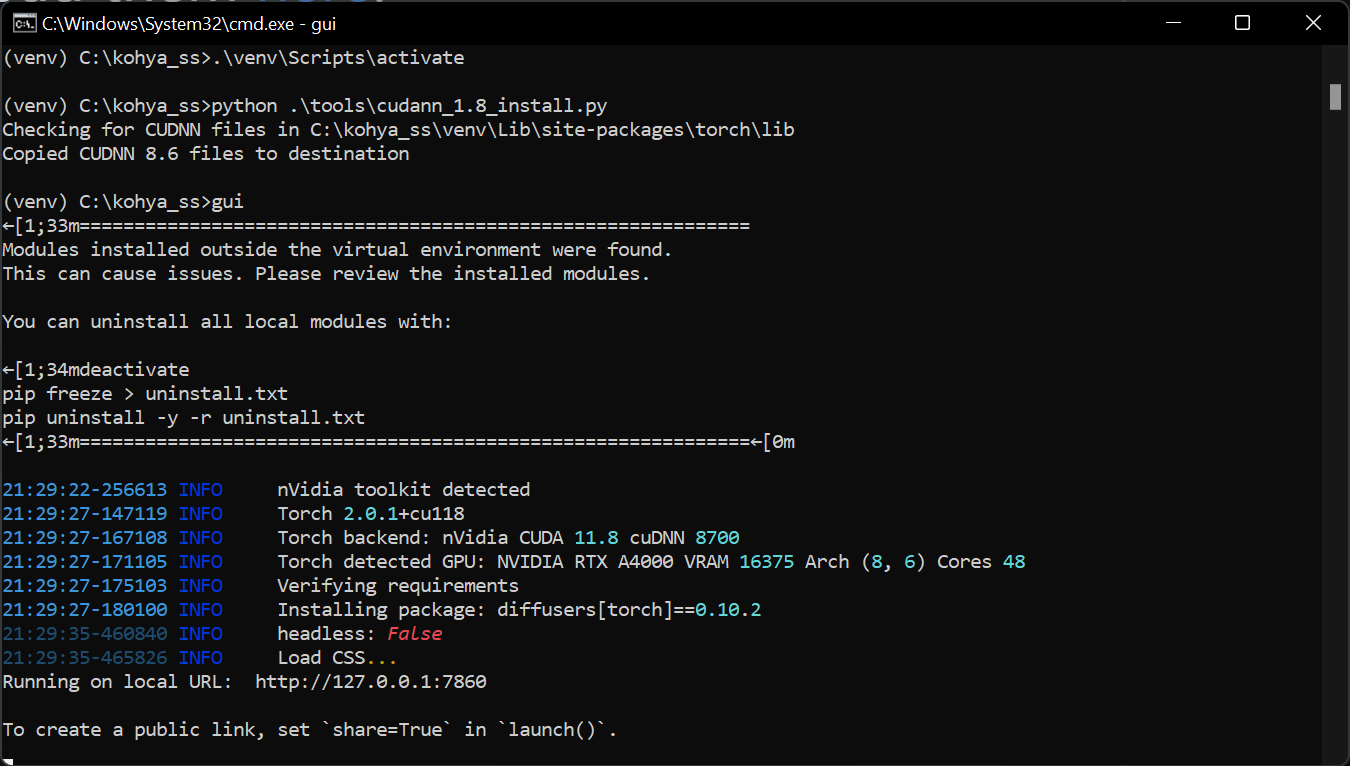
.\venv\Scripts\activate
python .\tools\cudann_1.8_install.py
You will learn CUDA version installed by running nvidia-smi in the terminal. You can get CUDA 11.8 here https://developer.nvidia.com/cuda-11-8-0-download-archive?target_os=Windows&target_arch=x86_64 or read further on what to do with the newest vesion.
If you have correct system paths this should finish your CUDNN 8.6 installation. After running the kohya-ss with guicommand, you should see no errors at startup.
(Updated) CUDA 12.1 (CUDA Toolkit) and cuDNN 8.7.0
You can run Kohya-ss with the newest CUDA installed too (CUDA 12.1 is compatible with CUDA 11.8). But you will need cuDNN 8.7.0 files.
- CUDA Toolkit https://developer.nvidia.com/cuda-toolkit
- CUDA Toolkit 12.1 https://developer.nvidia.com/cuda-downloads
- https://developer.nvidia.com/rdp/cudnn-archive find and download cudnn 8.7.0, unzip dll files from the bin folder in the archive and put them into C:\kohya_ss\cudnn_windows folder, install and activate as above
Issue Solved: PyTorch does not detect CUDA and starts on CPU only
in case the PyTorch will not detect CUDA (shows no CUDA and runs only on CPU, visible on gui startup) delete VENV folder and reinstal PyTorch by running gui setup 1-3
Running and Upgrading GUI
After everything is installed, you can run the tool with gui command, upgrade to the latest version with the upgrade command (there are prepared batch files in the kohya folder). After the batch finishes, enter the adress fom the terminal into your browser (it will be most likely http://127.0.0.1:7860/). When you get errors (after a big update), check the beginning of this article.
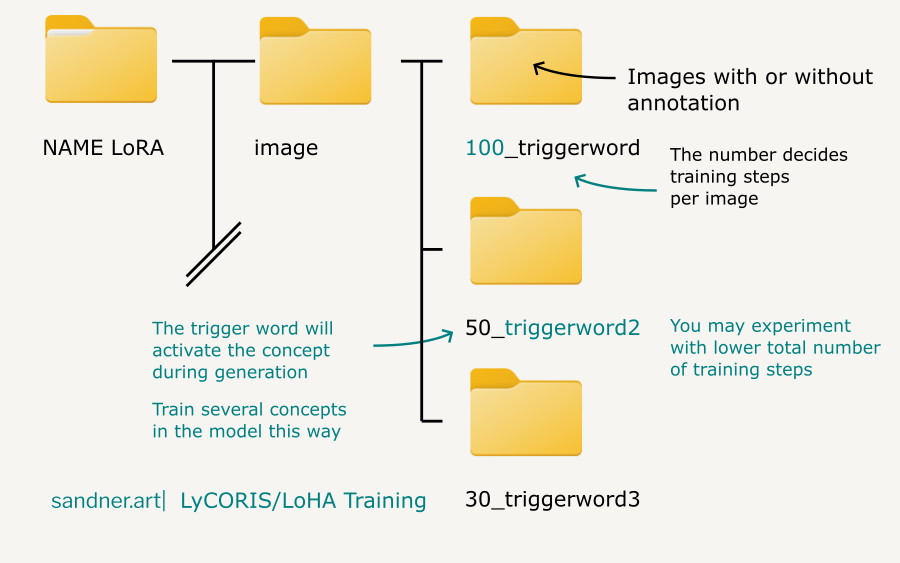
Folder Structure for image and caption pairs
Folder for training data should have this structure:
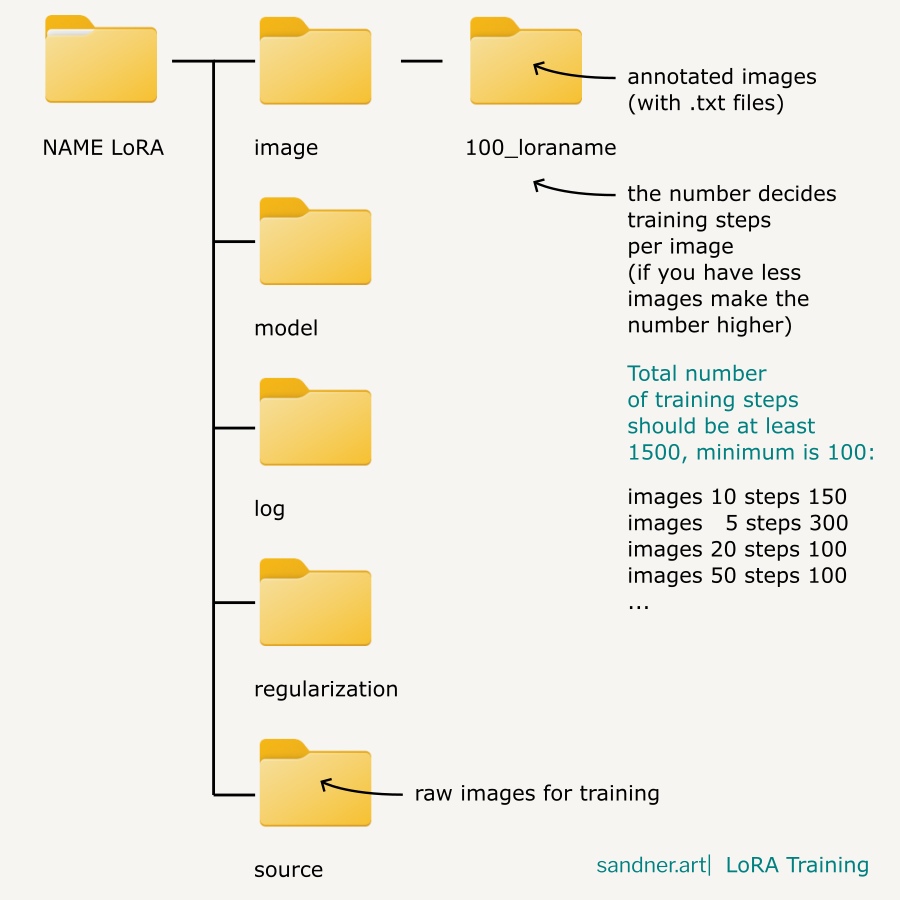
TIP: You may also test a low number of steps per image (5,10,20) and make the number of epochs higher. The setting for this strategy may vary depending on the type of model you are training. Some concepts may work even with a very low number of steps per image.
This is good for cutting down unnecessary long training times when there are many images in a dataset. You will probably want to test it for SDXL model training, together with this:
TIP: SDXL Redux Workflow
This tip is particularly useful for SDXL models, since it is producing huge LoRA models (but it will work for other SD versions too).
- Train a model for the best results regardless of file size (Network Dimension 128, 256)
- Use LoRA/Tools/Resize LoRA
- Set target dimension (f.i. 8,, 16, 32) and Resize model
- The resizing will take a couple of minutes. Try different settings which will work best for your model. The process will "filter out" the model, and what is interesting, sometimes you can end up with even better results than in the original huge .safetensors checkpoint.
Preparing Image Datasets (Image and Caption Pairs)
Model can be trained from photos or generated images for fine-tuning. General rules for the best results:
- size of the shortest side should be at least 512 (or rather 768) for SD and 1024 for SDXL (ideally for the training size, but it can have different aspect ratios).
- crop images (NOT needed, but recommended)
- every image should have a separate .txt with tags (captions), describing the image (optional for style training)
- after the image list is finished, rename the files (shorten filenames). Beware of duplicit names in case of several file types used (PNG, JPG)
- for an object or character, use different angle, pose, background (and describe it in the caption .txt pair)
- preferably use custom high quality resources (images without artifacts, blur, bad cropping etc.), retouch the unwanted parts if needed
Image Annotation Utilities (Tagging)
Basic Captioning and WD14 in Kohya
You can start tagging your image folder directly in Kohya tool. I suggest either Basic Captioninig or WD14 for general purpose. This will generate .txt files for you, which you can (and will) then edit.
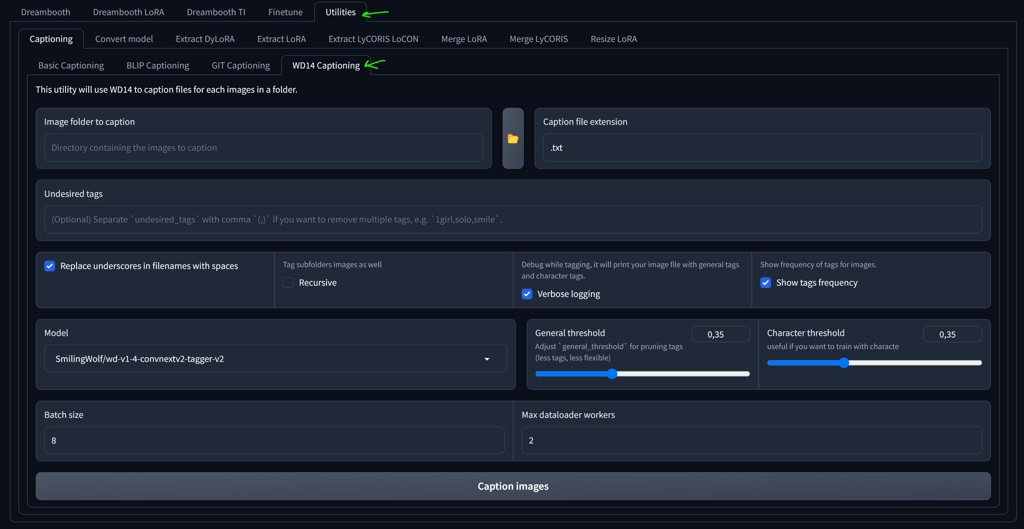
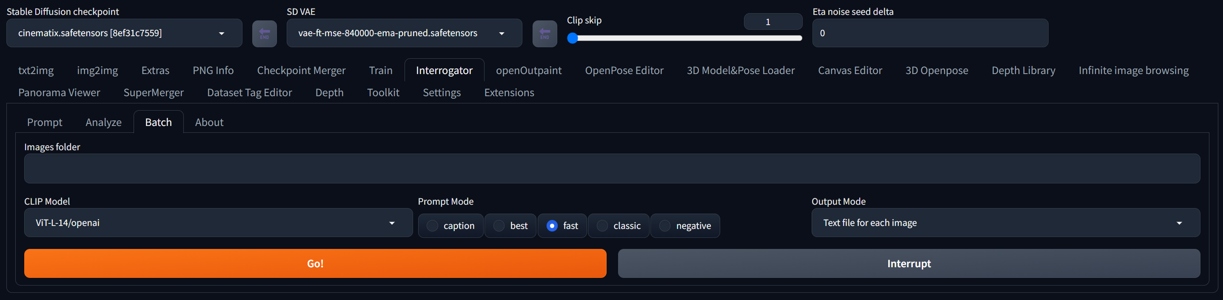
This is the fastest and simplest solution for general purpose. You can also use A1111 Interrogator for more complex results and model selection:
Interrogator (A1111)
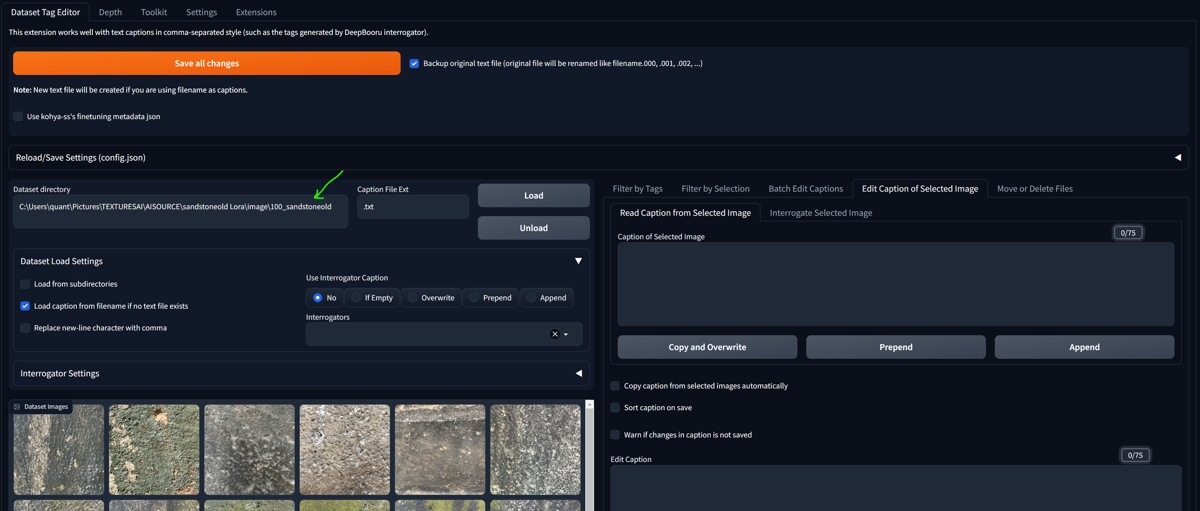
Data Tag Editor Extension (A1111)
Tagger Extension (A1111)
WD 1.4 Tagger interrogates images in similar way as previous extensions, install from Extensions/Available/Load from.
Booru Dataset Tag Manager
Useful tag annotation utility is https://github.com/starik222/BooruDatasetTagManager, learn more in the article on Preparing Image Datasets Annotations.
sd-tagtool
Very nice utility is sd-tagtool https://github.com/skiars/sd-tagtool. It has the functionality for editing and creating tags for image datasets, and the installation is simple and bugfree. It can replace Booru Dataset Tag Manager.
Annotation (Captioning) Strategies
Generally put into tag annotation these features, you want to define as variables to change when using the model for render. Some will be already prepared by WD14, some you need to edit in. Think of a description word (tag, token) as a variable.
For texture tools or styles, create tags manually with help of Basic Captioning,
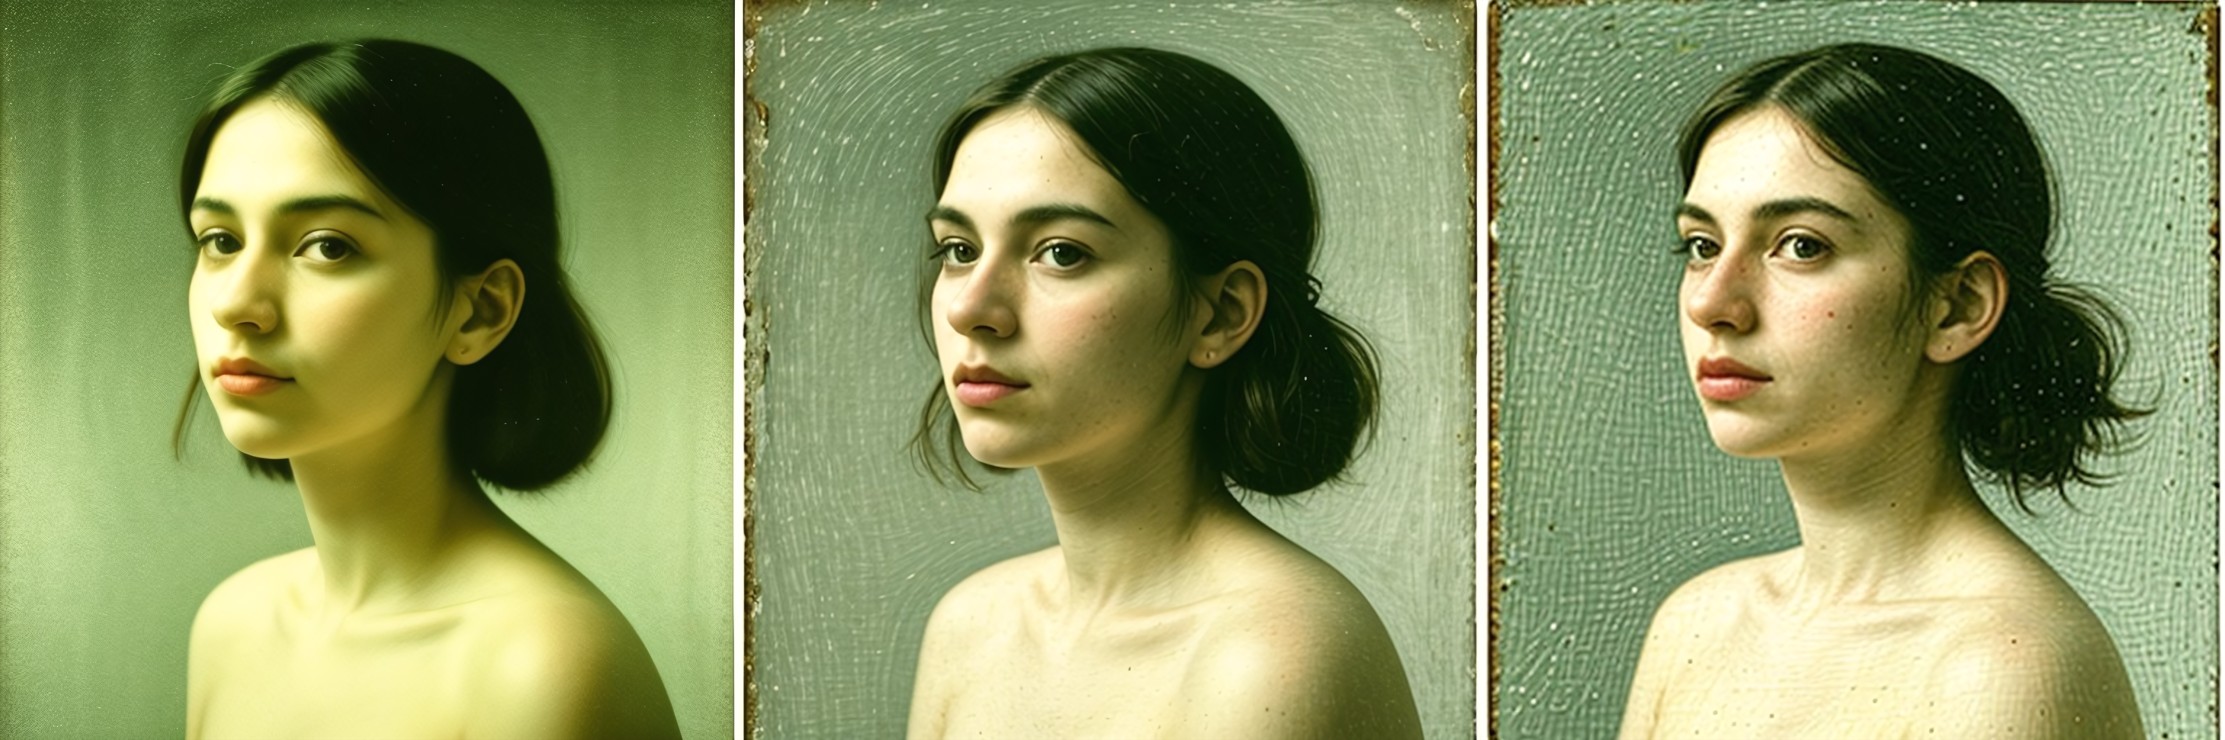
Captioning strategy can dramatically change the functionality of the final model. Try to describe only the features you want to see in the model, and in the other version only the features you do not want to see. Compare the results.
Example: If you tag portrait in your dataset, the feature of the portrait on your source image will affect portraits in the final model.
Training without an Annotation
When training for style or in a special case, you may train the dataset without caption pairs. It can also be done when training styles. You are losing the opportunity for "manipulating" the training
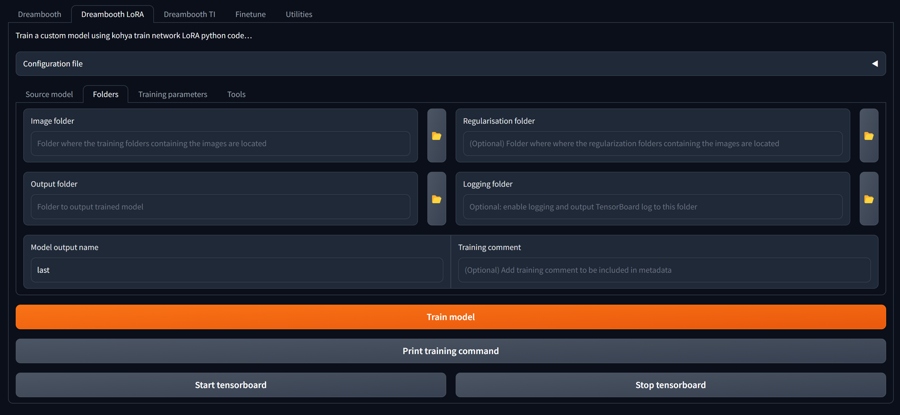
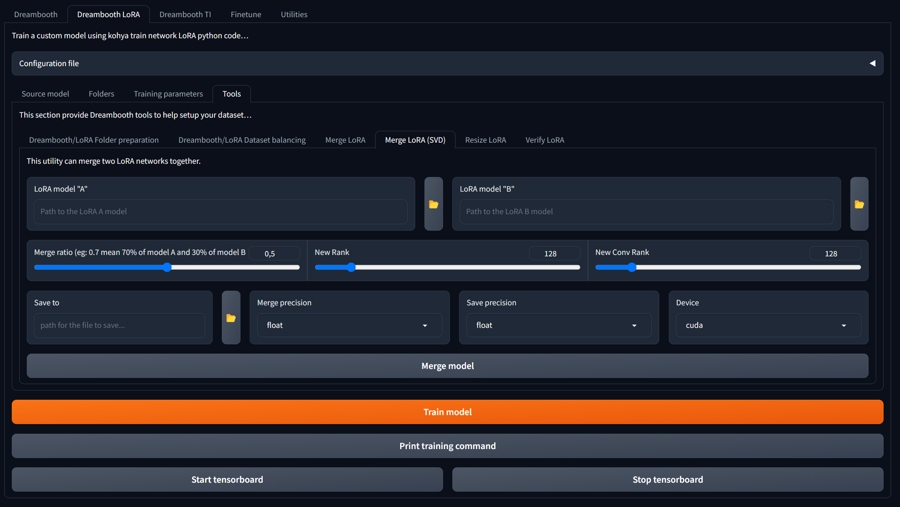
Quick Kohya Setup for LoRA Training
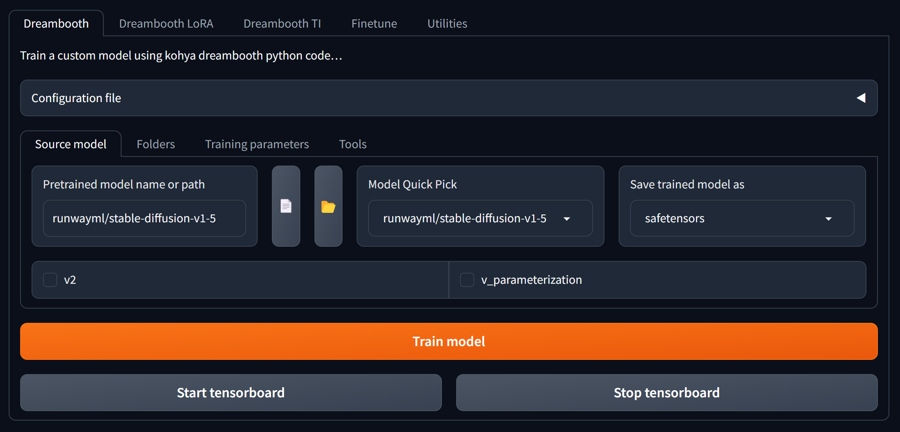
- Go to Dreambooth Lora tab
- Copy file path to the model checkpoint you want to train on, f.i. "C:\stable-diffusion-webui\models\Stable-diffusion\v2-1_512-ema-pruned.ckpt" (TIP: if you go to the Stable Diffusion model folder, right click on the model file and select Copy as Path for the menu in Win11)
- Download training .json configuration files from the repository https://github.com/sandner-art/ai-research/tree/main/LoRA-Training
- Load the setup .json file for a quick start by clicking Dreambooth LoRA/Open (click on arrow in the Configuration file line)
- You may then experiment with settings (optimizer is set to ADAMW in these test files)
Training for 3D Texturing
- Use quality input images
- You may prepare the files for the training resolution (if using bucketing it is an optional step), i.e. 512x512, 768x768
Object and Concept Loras
Preparation of dataset is important for the final result. Learn more in the following article on Dataset Preparation.
Underfitting and Overfitting
To avoid unwanted artifacts caused by model training, test several versions (number of training steps, epochs). Versions will be saved by epochs in your new Lora model output directory. A model should work reasonably at default (1) weight.
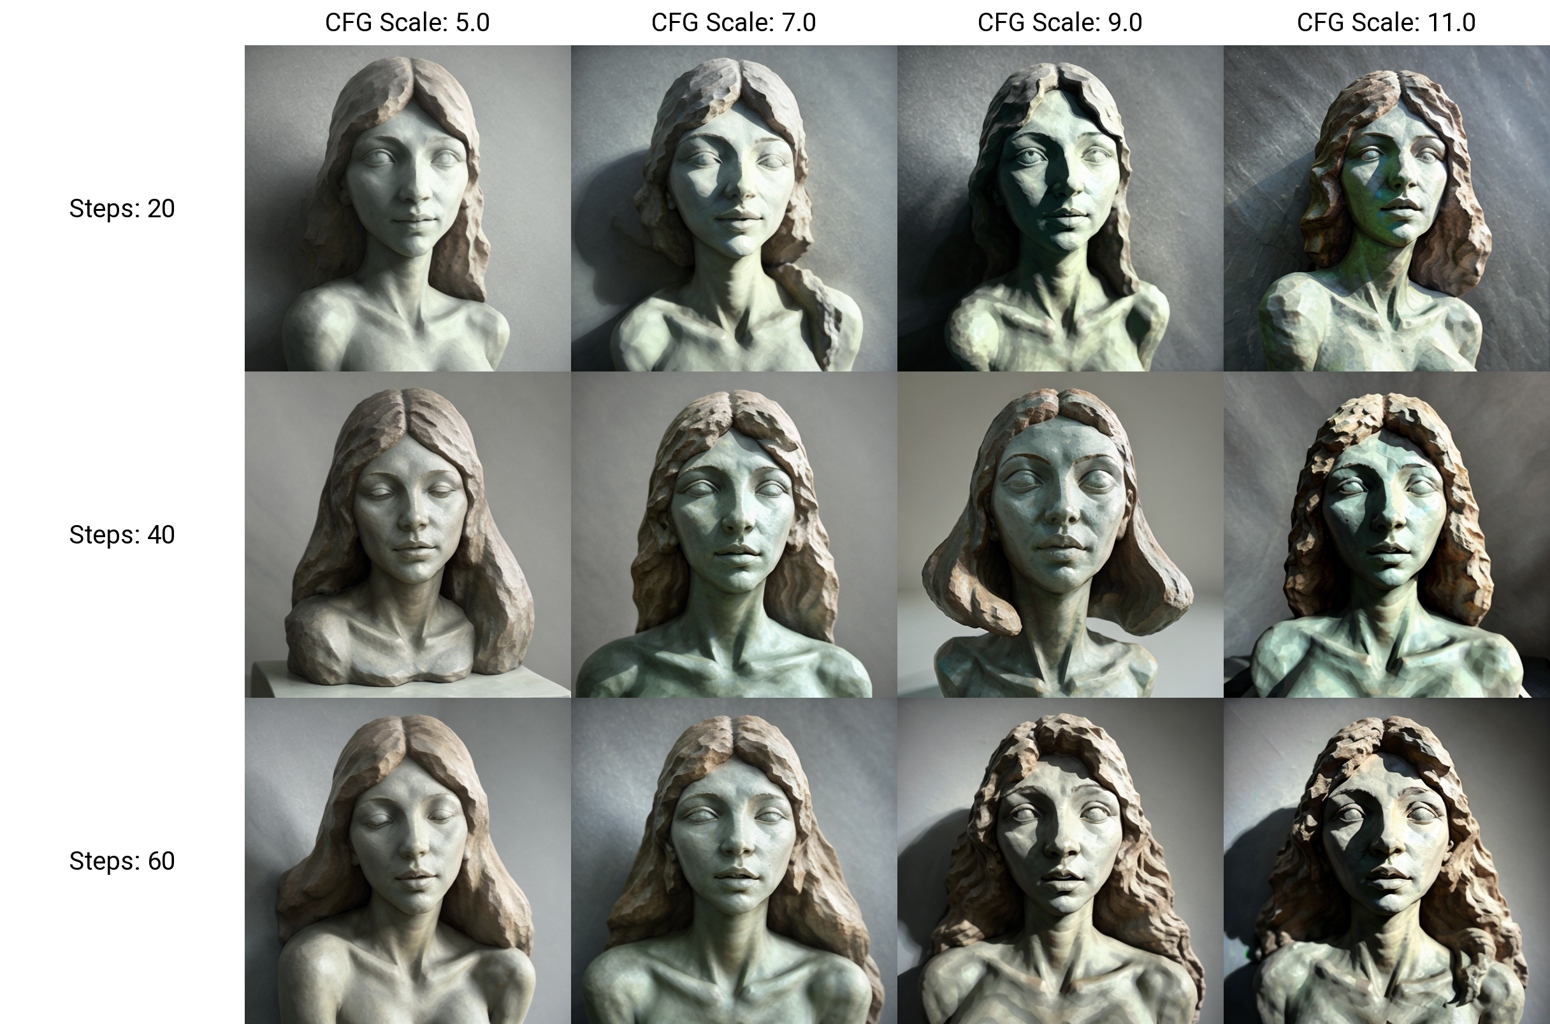
Testing the Results with X/Y/Z Plot Script
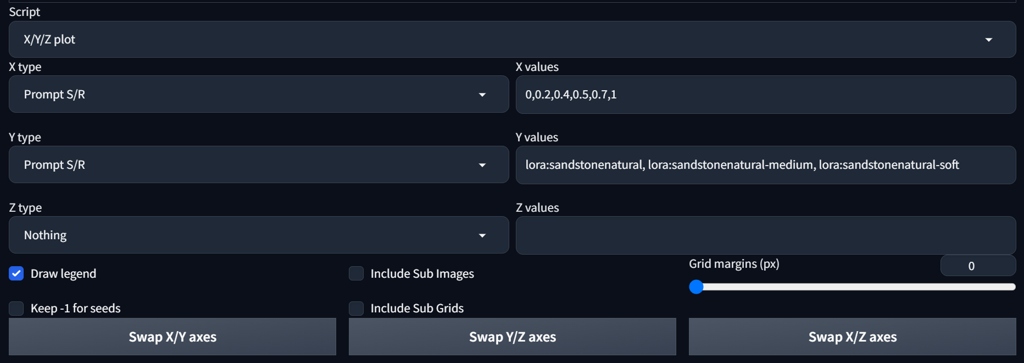
To evaluate the quality of a LoRa, we can plot the outputs using X/Y/Z Plot Script in A1111. In prompt you use a keyword which will be searched and replaced by the script and the result plotted into an ouput image. You can plot many variables for the generation this way.
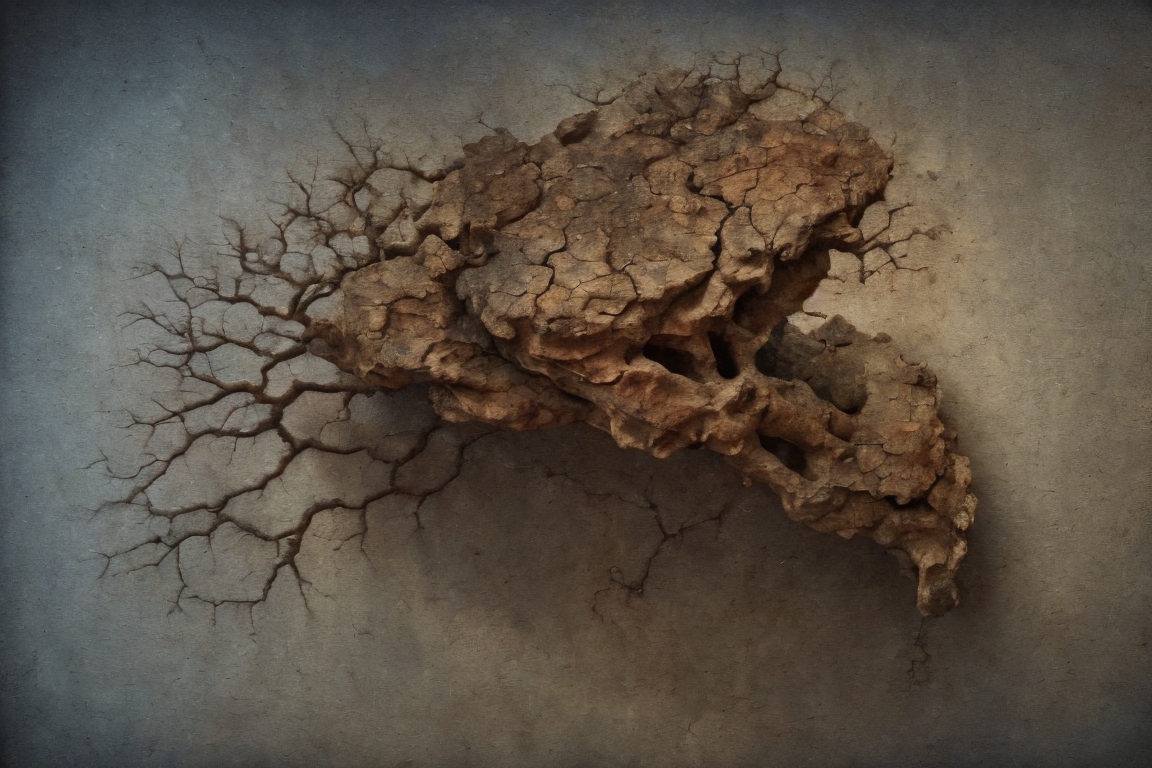
Now we are want to test three LoRAs in various epochs, named sandstonenatural, sandstonenatural-medium, sandstonenatural-soft. For prompt sandstone cracked texture <lora:sandstonenatural:0> the search and replace setup would look like:
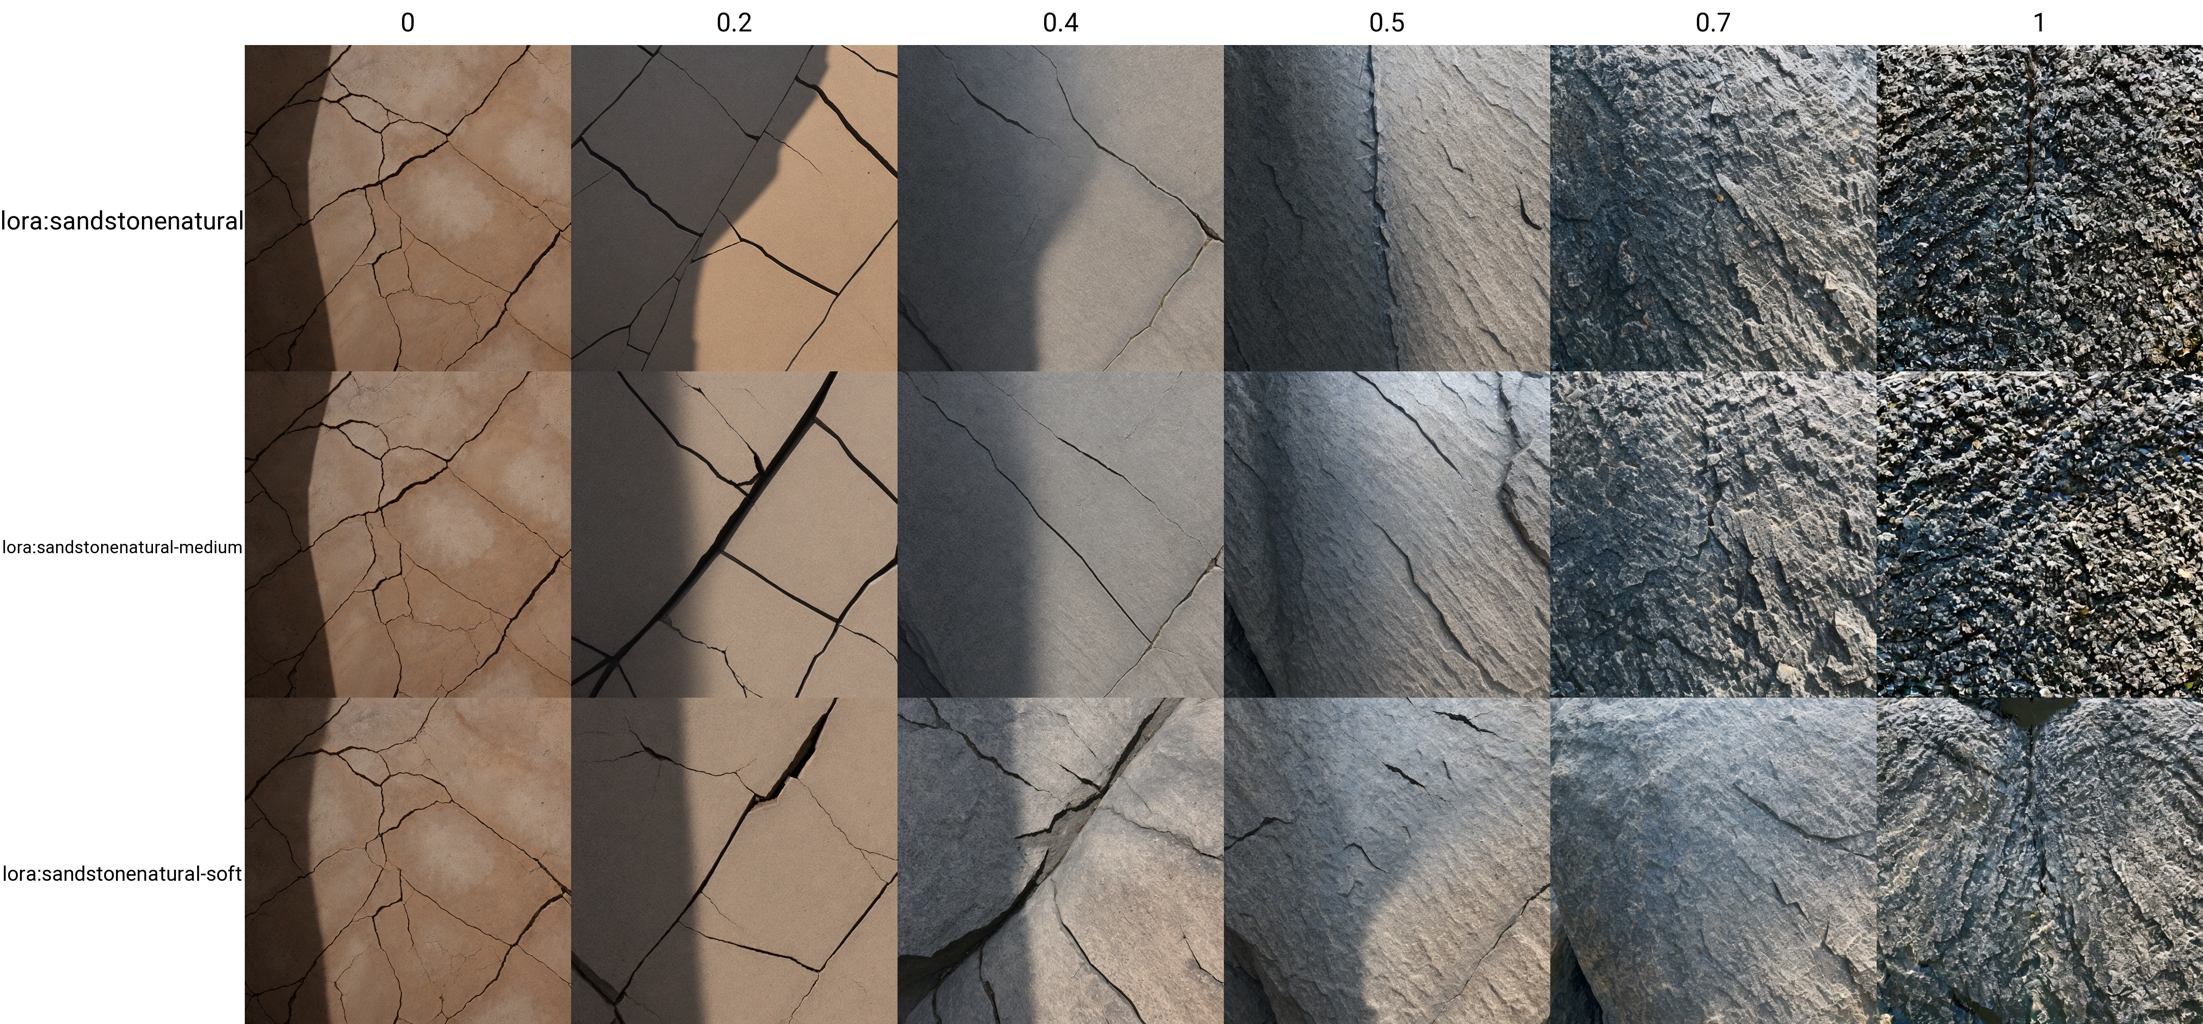
We can see that at the higher weights (1, the column on the right) some epochs tend to "overbake", them image starts to have more contrast. We would either train again withh different setup, or choose the lower epochs.
Numerical plots can be entered in way STARTvalue-ENDvalue (+step), so in next test we will select CFG scale and Steps and enter:

Merging and Fine-Tuning
While working on Lora versions, you can merge several Loras together, combine them with model, and perform various manipulations with dataset.
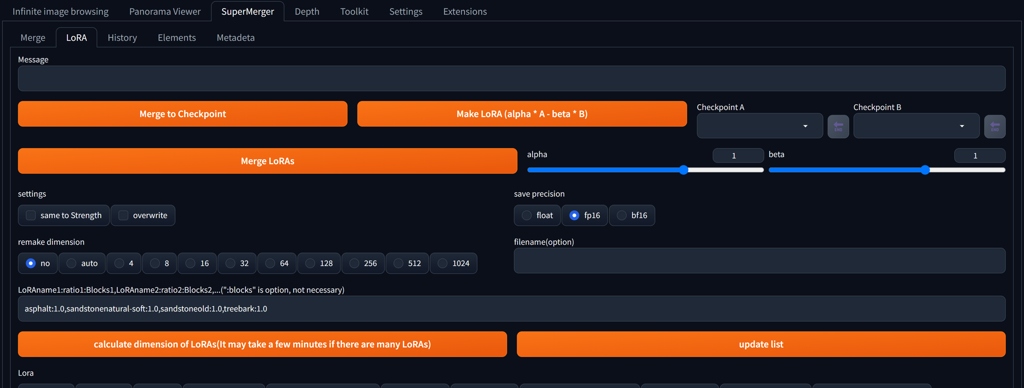
You can also install Supermerger extension for A1111, with a similar functionality.
How to Continue Training
You can continue training of a finished checkpoint by using LoRA/Training/Parameters>LoRA network weights (ideally load your former training settings first). Check DIM for weights.Set number of epochs. Then proceed with training.
Tips for SDXL Training
- Try SDXL Redux Workflow (described above)
- When testing, take into account that SDXL have better results in base model around 50 sampling steps (if you are using base model as your main workflow), fine-tuned models require around 20 steps or less
Conclusion
This article was a brief overview of installation an basic workflow for LoRA training. For an artist and designer, creating its own tools belongs to the fundamental skill set. It allows you even more creative freedom and vast amount of applications for your projects. For more tools and utilities for designer workflow, check the Entropy AI project.